
«Navitel.Friends»
The "Navitel.Friends" interactive service allows real-time viewing of friends' positions on the map, planning of a route using these positions, sharing coordinates of points of interest and exchanging messages.
The service is accessible only for devices having access to the Internet.
To be able to use the "Navitel.Friends" service
- a user must have a registered account at NAVITEL® website (www.navitel.cz), and
- there must be at least one device with "Navitel Navigator" registered in the account.
The account information will be required upon switching on the service.
Quick registration will be suggested upon switching on the service if a user hasn't got an account or the device has not been registered in an existing account.
- To display the "Navitel.Friends" icon
 in the upper panel of the main screen select "Menu" → "Settings" → "Interface" → "Map buttons" → "Navitel.Friends" (a mark with a tick must be green).
 - To switch on the service select either a) the "Navitel.Friend" icon in the upper panel of the main screen → "Turn on", or b) "Menu" → "Settings" → "Online services" and set the "On/Off" switch in the "Turn on Navitel.Friends" field to "On" position.
- Enter the login and password of your account in the corresponding fields (Fig.1). Set the "Remember password" switch to "On" if you do not want to enter the password each time that you turn the service on. Press "OK".
If you haven't got an account or the device has not been registered in the account, follow the "Registration of a new account" or "Registration of a new device in an existing account" instructions below.
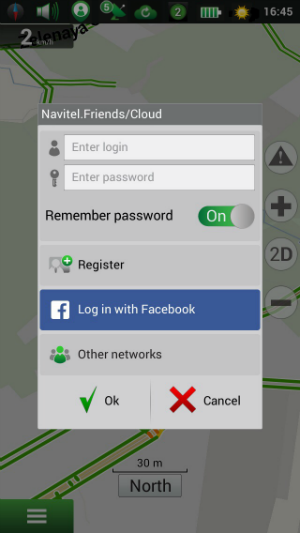
To delete the password from the memory of the program select "Menu" → "Settings" → "Online services" → "Navitel.Friends" → "Forget password".
Registration of a new account
- Select "Register" in the screen (Fig. 1).
- Select "Register new account" (Fig. 2).
- Think up a login, a password and a device name and fill out the corresponding fields.
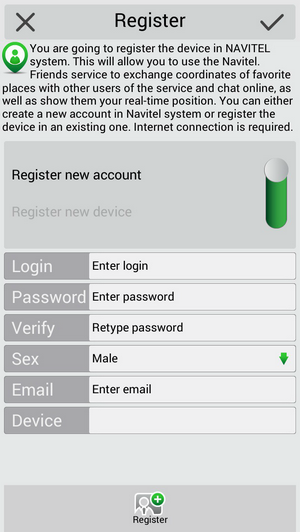 Fig. 2
 - Press "Register" at the bottom of the screen or "OK" in the top right corner of the screen.
Registration of a new device in an existing account
- Press "Register" in the screen (Fig. 1).
- Select "Register new device" by setting the slider to the corresponding position (Fig. 3).
- Enter login and password, then think up the device name and enter it.
- Press "Register" at the bottom of the screen or "OK" in the top right corner of the screen.
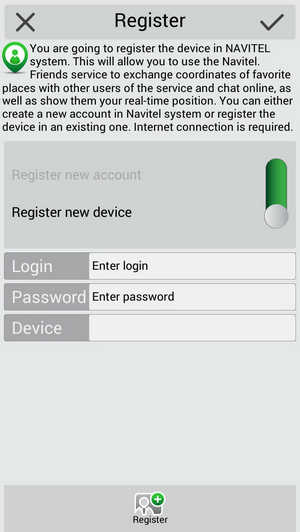 Fig. 3
Menu of the "Navitel.Friends" service includes the following points:
- "Turn on"/"Turn off" for switching the service on and off (Fig. 4).
- "Friends" for displaying the list of friends, viewing their profiles, including their positions in a route, and exchanging messages.
- "Find friends" for finding other users of the service and adding them to the list of friends.
- "Friendship requests" for displaying information on received and sent friendship requests (Fig. 5).
- "Groups" for uniting users in affinity groups for exchanging messages and coordinates.
- "Settings" for setting parameters of the service and privacy.
- "Cancel" for exiting the menu.
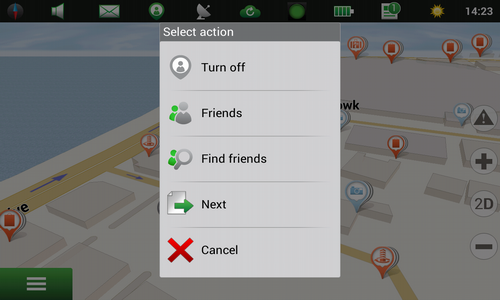 Fig. 4
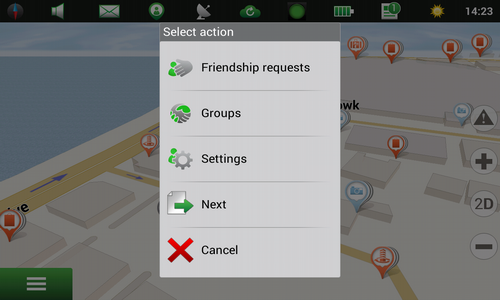 Fig. 5
"Friends", "Find friends", "Friendship requests" and "Groups" become active only after a successful authorization.
To proceed to the settings of the "Navitel.Friends" service select either a) "Navitel.Friends" icon ![]() in the upper panel of the main screen → "Settings", or b) "Menu" → "Settings" → "Online services" → «Friends settings».
in the upper panel of the main screen → "Settings", or b) "Menu" → "Settings" → "Online services" → «Friends settings».
The following parameters and options are available here:
- "Turn on Navitel.Friends" for switching the service on or off.
- "Profile", which contains user data and a list of registered devices, and allows editing user information. To edit the data press "Edit profile", fill the corresponding fields in and confirm by pressing "OK" in the top right corner of the screen. Other users will be able to view all the indicated data in search results and after adding the user to the list of friends.
- "Devices", which contains the list of devices registered in the account.
- "Forget password", which deletes the password from the program memory if the "Remember password" option was active upon switching on the service. After pressing the button and confirmation the password will be removed, so the user will have to enter it upon the next switching on the service.
- "Hide own devices on map", where with the help of "On"/"Off" switch it is possible to hide/show all devices of the account on the map of the device.
- "Offline users on map", which allows setting a filter for showing friends who are offline on the map: "Hide all", "Hide irrelevant", and "Show all".
- "Update position", which determines how often your current position will be updated to be shown on the maps of your friends and you friends' positions on your map.
- "For new friends/groups", which is intended for setting privacy status for a new friend/group: "Share exact device location", "Share rough device location", "Do not share device location", "Define privacy individually". When a new friend is added, a selected privacy status will be assigned to him/her automatically. This however is not applicable when "Define privacy individually" was selected. In this case there will be a numerical indicator on the icon of the service and in the "Friendship requests" field in the service menu corresponding to the number of friends for whom privacy status has not been set. Position of the device will be hidden from these new friends until privacy status is set. The same principle is applicable to groups.
- "Your position in Navitel.Friends", which helps to determine the source of your location data for their use in the service: location determined via the GPS receiver or location selected manually on the map. When "Specify position manually" is chosen the "Specify current position" field becomes active.
To find a user in the service
- Press the "Navitel.Friends" icon in the upper panel of the main screen.
- Select "Find friends", enter the name of a user in the "Navitel.Friends" service and press "OK" in the top right corner of the screen.
- User information will be displayed in the screen.
After that select "Send request" to add the user to the list of friends, enter the text of the message and press "OK". The user will receive a notification and will be able to either accept or reject the request. Press "Cancel request" to remove information about the request from both your program menu and that of the recipient.
You can see the requests (sent and received) by tapping the "Navitel.Friends" icon and then selecting "Friendship requests". If a request has been accepted it will be marked as "Request accepted".
There are some limitations in the service: a) a user can send up to 10 friendship requests within 10 hours, and b) a user cannot send a friendship request to a user who has previously rejected his/her friendship request. However if the user who has first rejected the request sends back friendship request, then it will be again possible to send him friendship requests.
A user profile becomes accessible from the list of friends after he/she has accepted your friendship request.
To see the list of friends tap on the "Navitel.Friends" icon in the upper panel of the main screen and select "Friends". The list shows brief information on all the friends, such as user name, profile picture, status (online or offline), time of the latest status update and location.
For quicker finding of a friend start typing his name in the entry line in the upper part of the screen.
Tapping on the name of a friend in the list opens his full profile.
- General information: user name, picture and status (green contour of the picture means that the friend is online, grey contour means that the friend is offline). Tapping on the field opens the friend's detailed information. By tapping on the "Edit" button you can change the name of a friend that will be displayed in your program.
- "Location": selection of this point shows the map with a marked position of the friend, and the tracking mode becomes active (movement of the map following movement of the friend). The tracking mode becomes inactive when the user starts operating the map (tapping on the map, zooming in or out, and other).
- "Messages": shows the latest message from the message history. Tapping on the field opens the message history.
- "Devices": shows the list of friend's devices, which you can see on the map in accordance with his/her privacy settings. Tapping on the field opens the "Friend's devices" screen with information on location of each of them, date and time of the latest status updates. Selection of a device in the list opens the part of the map with its location.
- "Privacy": selection of the field opens a window in which the user can choose to show or hide the position of the device on the map of the friend: show exact position, show rough position or hide position.
- "Break friendship": tapping on the field deletes the friend from the list of friends, message history and stops displaying of corresponding devices on the maps.
The "Navitel.Friends" service allows setting privacy which controls displaying of positions of the devices on a friend's map. Privacy must be set on each of the devices added in the user account.
If you enable this service, your friends will be able to see your location all the time, even when the application is not running. You can change the privacy settings in the application.
To set privacy
- Tap on the "Navitel.Friends" icon and select "Friends".
- Then a) tap on the tick icon to the right of the name of a friend, or b) select a friend in the list and then select "Privacy" in his/her profile.
- Select one of the options:
- "Show exact position": the friend sees exact position of the device on his/her map and its status (online/offline).
- "Show rough position": the friend sees the settlement, where the device is and the status of the device. The device is shown in the center of the nearest city. If the device is located far from any city, the position of the device is shown with the accuracy of several kilometers.
- "Hide position": the friend sees neither the device on the map, nor its status.
To remove a friend from the list of friends press the "Navitel.Friends" icon in the upper panel of the main screen and select "Friends". Select a friend that you wish to remove from the list of friends, then press "Break friendship" and confirm.
All devices of friends are displayed on the map if the information on their latest position is available, and with regard to the settings of displaying offline users ("Navitel.Friends" → "Settings" → "Offline users on map"). If a friend is online his/her icon is highlighted in green on the map, if he/she is offline – in grey. Tapping on the icon on the map opens the friend's profile.
If two or more friends are located very near each other and the center of one icon is hidden by another, they are united in a single icon indicating the number of devices. Tapping on such an icon opens the list of friends located in this point.
The "Navitel.Friends" icon indicates the number of received friendship requests and the number of new friends requiring setting privacy. More detailed information is displayed upon tapping on the icon of the service. For example, if there is a received friendship request, a corresponding point of the service menu will be as follows "Friendship requests (1)" where a number in brackets means the number of new requests.
To send a new message
- Tap on the "Navitel.Friends" icon in the upper panel of the main screen and select "Friends".
- Select a friend in the list.
- Tap on "Messages".
- Enter the text of the message in the entry line and press "Send". The text of a message being processed is orange. If a message sending has failed the text of the message is red. After tapping on such a message the system will suggest resending it.
A message history contains all the messages received from a friend and sent to him, the latest messages being displayed at the bottom of the message list. The received messages are shown in the left part of the screen, the sent messages – in its right part. Messages sent by a user in a row within 10 minutes are grouped. The earlier messages are automatically downloaded from the server and added to the message history upon scrolling the message history.
The messaging function includes the option for sending coordinates of various points of interest. To send coordinates select "Messages" → entry line at the bottom of the screen → "Attach" → a search option → a POI → "Send". Tapping on the message containing coordinates in the message history opens the "My route" screen with the point marked on the map, which makes it possible to include the given point in the route.
Tap on the "Navitel.Friends" icon in the upper panel of the main screen and then select "Groups" to proceed to the function.
The function makes it possible for users of the "Navitel.Friends" service to join existing groups and create new ones, which may unite users both included and not included in the list of friends.
To find a group press "Find" in the bottom left corner of the "Groups" screen, type the name of a group (full or its part) into the entry line and press "OK" in the top right corner of the screen. If you wish to join the group, press on the group in the search result and select "Enter group" in the "Group info" screen.
To create a new group press "Create new" in the bottom right corner of the "Groups" screen, type in the name of a new group in the entry line, determine its type, enter its description, and press "OK" in the top right corner of the screen. The type of the group determines its access settings: every user can enter an open group; access to a closed group is granted by the owner of the group; people outside the group can see and join a hidden group only if they have received an invitation from its owner.
To see the detailed information on a group select the group in the list. The profile of a group includes the following: "Member list", "Chat" (message history available to all members of the group), "Invite friends" (sending an invitation to a friend: having pressed this button select a friend from the list and press "OK" in the top right corner of the screen), "Notice about new messages" (indication of newly received messages in the upper panel of the main screen). "Privacy" (settings for display of your position on the maps of other group members) and either "Delete group" (if you are the owner of the group) or "Leave group".